Maker artwork
Embroidered Patch Design: Check Detail at Finished Size
A patch can look sharp when enlarged on a screen and lose its name, emblem or small gaps once stitched at the intended size. Start the artwork review with physical dimensions, then decide which details deserve the available space.
We built a fictional 75 mm LANTERN CLUB patch in a live Ciyo project, compared a deliberately over-detailed draft with a simpler version, and revised its thin lines. The outputs are artwork for review; no embroidery machine, stitch file or physical patch was tested.
Quick answer: simplify at the size you plan to stitch
Fix the finished dimensions before comparing designs. Give the name and main symbol priority, reduce decorative detail, and reserve the border before adding small features. Use the maker’s actual artwork rules as a review reference.
A vector file keeps edges editable. It does not specify stitch direction, density, underlay or fabric behavior. Those decisions belong in digitizing and the physical sample.
| Step | Prepare | Decision |
|---|---|---|
| 1 | Finished dimensions and required wording | What must remain recognizable? |
| 2 | A simpler and a detailed draft | Which details carry the identity? |
| 3 | Measured letter and line review | What needs enlarging or removing? |
| 4 | Source and comparison board | Can the maker inspect the intended changes? |
| 5 | Digitized proof and physical sample | Does the stitched result support approval? |
1. Set the patch size and choose the essential content
The example is a proposed 75 mm circular club patch with a lantern and the name LANTERN CLUB. These are fictional design choices, not measurements taken from a manufactured item. Hold the diameter constant so the comparison tests simplification rather than a larger patch.
Ask the selected maker which process fits the design. Personalised Patches UK lists 5 mm embroidery cap height, 0.8 mm lines and a 2–3 mm merrowed border in its guidance; it also recommends raising thin lines to 1 mm or more. These are that supplier’s instructions, not universal limits.
If essential wording cannot fit, consider a larger patch, shorter wording or a different process with the maker. Do not shrink the name until it merely passes a screen preview.
2. Make the comparison reveal what you are removing
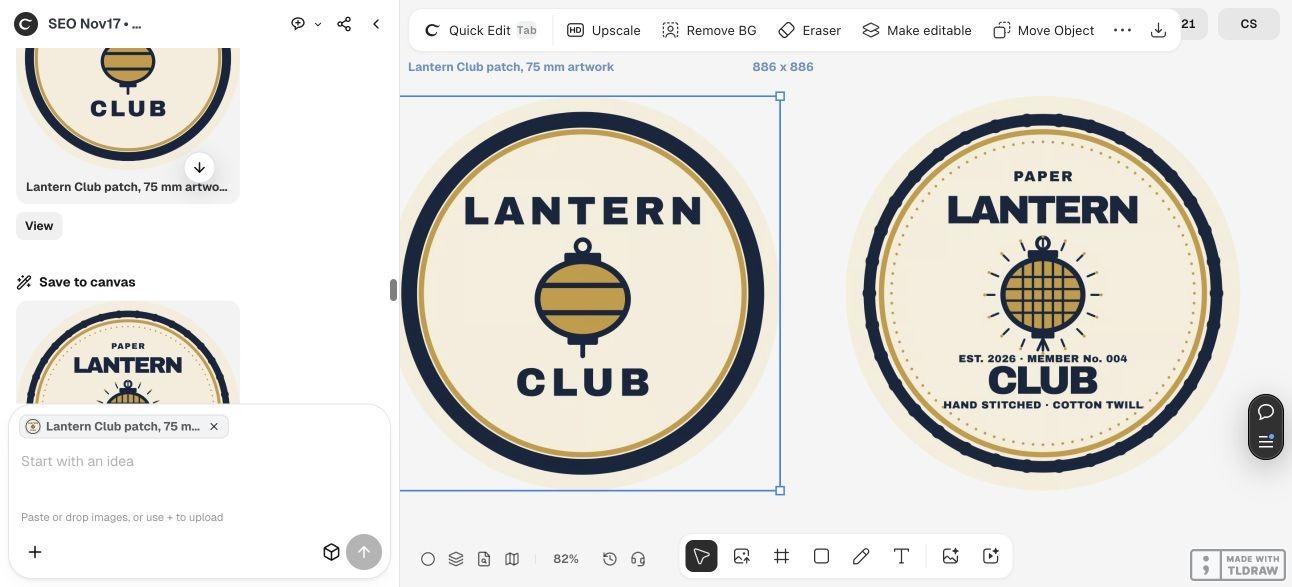
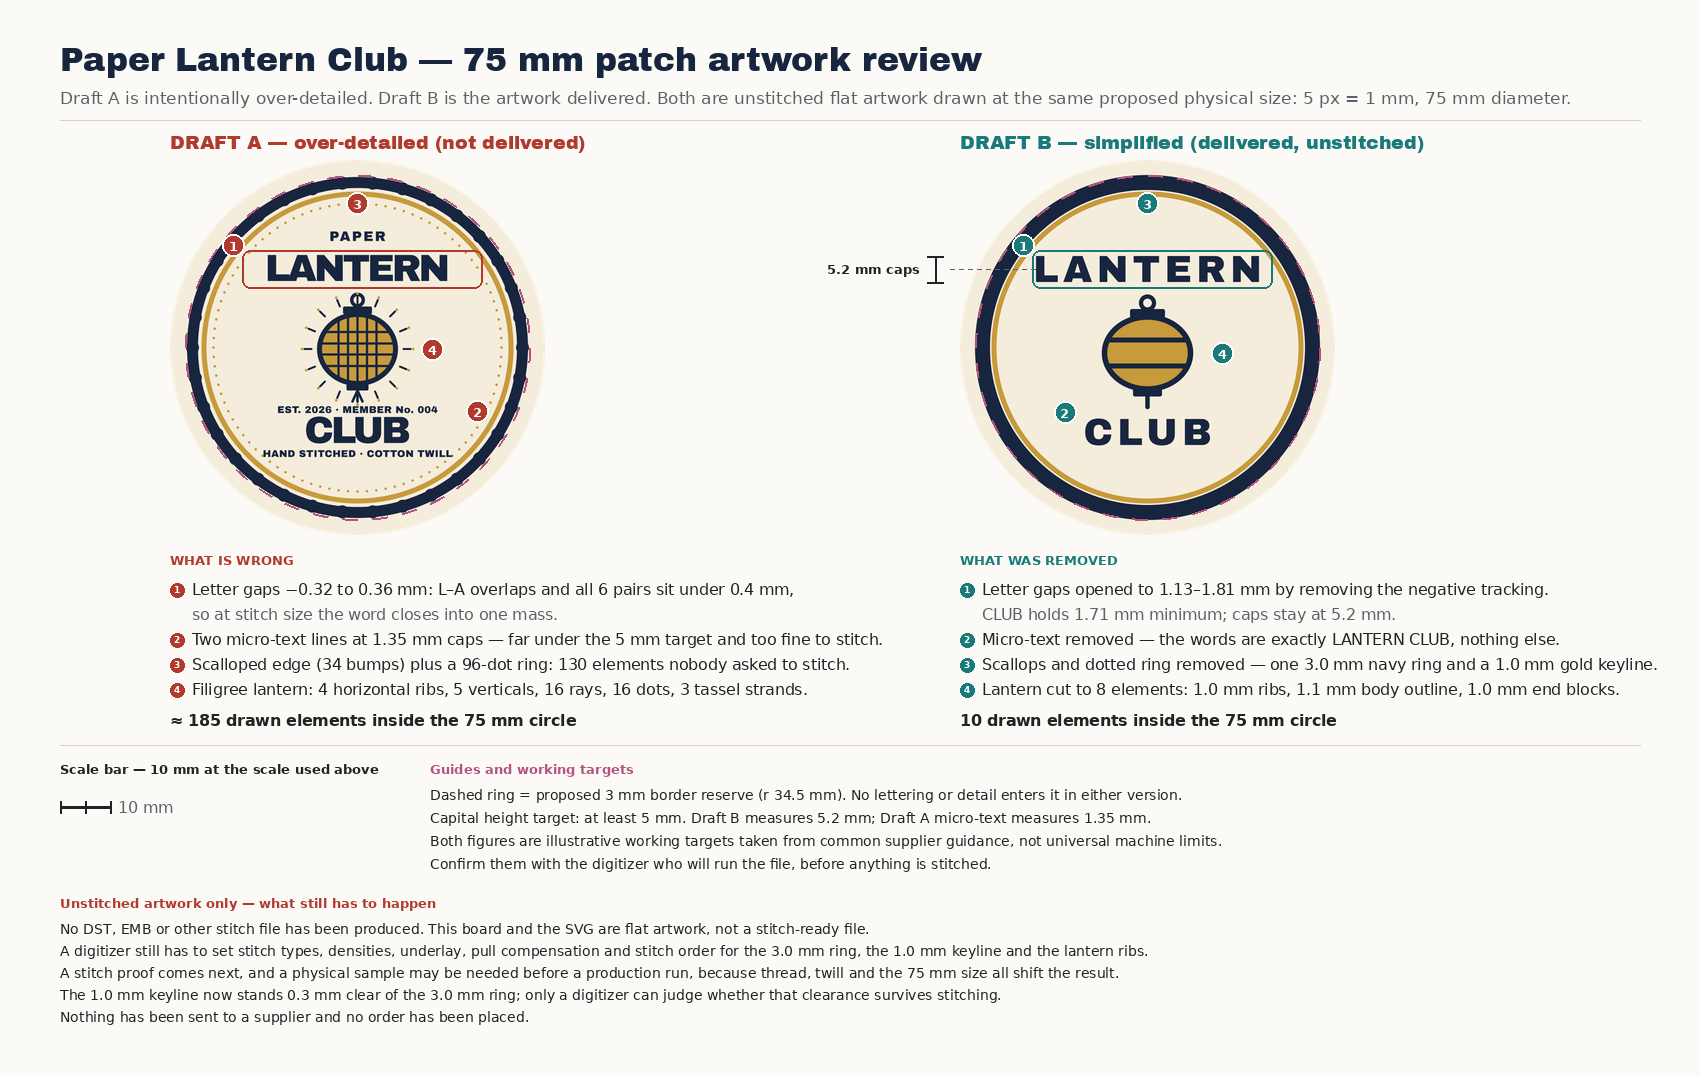
Ask Ciyo for both a clear version and a deliberately over-detailed comparison at the same finished size. The detailed draft is useful when it exposes a specific tradeoff: extra rays, smaller lettering or narrow separations can compete with the emblem.
The live run used vector geometry and lettering rather than an image model. The screenshot shows the actual initial brief; the following revision made the line-weight changes explicit. Design agent reasoning is billable usage even when no image model is used.
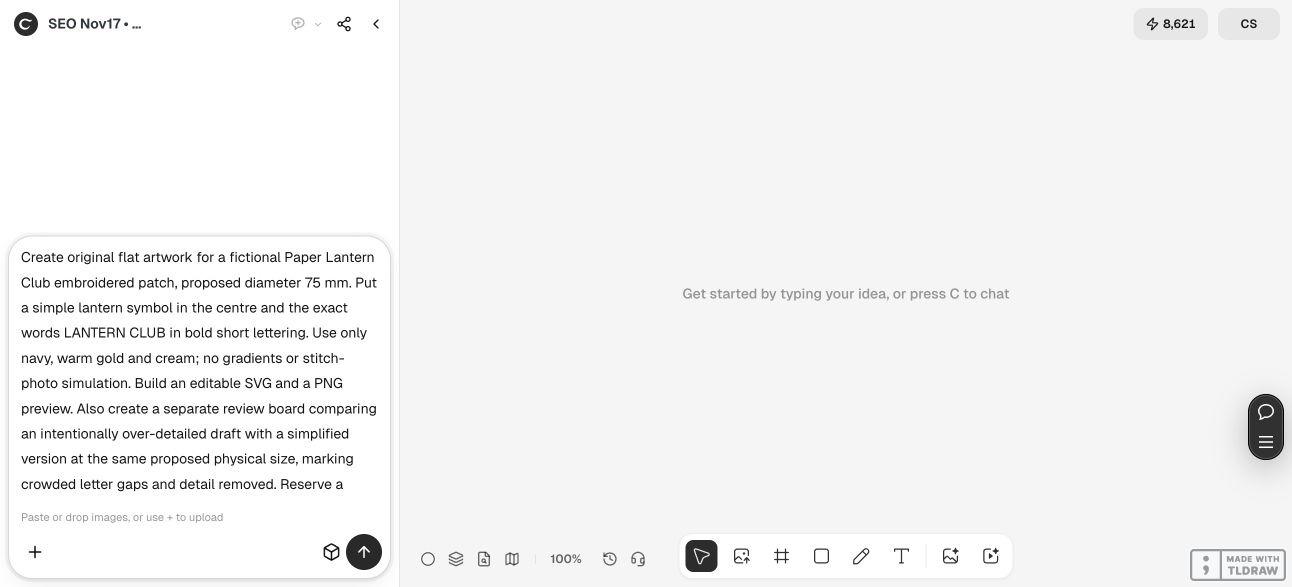
Create original artwork for a fictional [club name] embroidered patch at [finished dimensions in mm]. Keep [exact wording] and [main emblem] essential. Make one simple version and one deliberately over-detailed comparison at the same size. Reserve the border and explain the intended lettering and line dimensions using [chosen maker’s guidance] as a reference. Deliver editable source and a review board. Do not call it stitch-ready, generate a machine stitch file, order samples or contact a supplier.3. Revise thin features, then inspect the spaces they leave
The first source used 0.7 mm crossbars and a 0.8 mm gold keyline. We requested 1 mm versions and a clearer handoff. Keeping both versions made the change inspectable rather than relying on a general claim that the artwork was improved.
The revised gold keyline leaves a narrow 0.3 mm space beside the navy ring in the source. Thickening one part can reduce the gap next to another. Treat that space as a question for the digitizer; this example does not establish that it will remain open in thread.
Check the wording, the lantern’s internal gaps and the border together. If a detail only works at high zoom, remove it, enlarge it or change its relationship to the nearby shapes. Keep a note of the intended change so the maker does not restore the old detail during redrawing.


4. Hand over sources that preserve the intended design
Two SVG variants are supplied below. The live-text file keeps the wording editable and depends on Archivo Black. The outlined file turns the lettering into paths, reducing font-substitution risk when another person opens it.
Ciyo supplied these SVG sources as copyable text because this run’s canvas handoff did not attach SVG files. We saved and checked the source separately. Neither variant is a DST or another machine stitch format.
Use the review board to explain the artwork decisions, but keep it separate from the source the maker will digitize. Its labels and comparison layout are review material, not extra patch artwork.


5. Approve the stitched result separately
Ask the maker to review the dimensions, border, thread choices and narrow areas before digitizing. Request a proof that identifies any changes to the artwork. Compare the wording and lantern against the source, including the areas you deliberately simplified.
Then inspect a physical sample on the intended backing or application. Look for readable lettering, open separations and a border that suits the shape. An attractive vector preview cannot establish those outcomes.
If the sample loses an important feature, revise that feature and compare another sample. Keep artwork approval and production approval as separate decisions so a clear screen image is not mistaken for evidence about the finished patch.
Embroidered patch artwork questions
Does an SVG make a design ready to stitch?
No. SVG is artwork geometry. A digitizer still needs to translate it into stitches for the chosen size, material and process, and a physical sample is needed to judge the result.
Should I always remove small details?
Keep the details that carry the identity, then review them with the maker at finished size. If the required detail cannot reproduce acceptably, discuss a larger patch or another process.
Why supply live text and outlined lettering?
Live text makes wording changes easier but needs the intended font. Outlined lettering preserves the drawn shapes without that font dependency; changing the words requires editing the shapes or returning to the live-text version.
Can I use the example’s dimensions for every supplier?
No. The 75 mm diameter is an illustrative brief, and the cited line and lettering guidance belongs to one maker. Use the instructions for the supplier and product you actually choose.
Was a patch manufactured for this article?
No. The live Ciyo demonstration produced artwork, revised sources and comparison images. No supplier was contacted, stitch file created or physical sample claimed.
Start with the patch’s finished size
Give Ciyo the wording, emblem and dimensions, then compare a simpler design with the details you are considering. Use the source to discuss digitizing and a physical sample with your maker.